Installation on RedHat/CentOS
Organization
LemonLDAP::NG provides these packages:
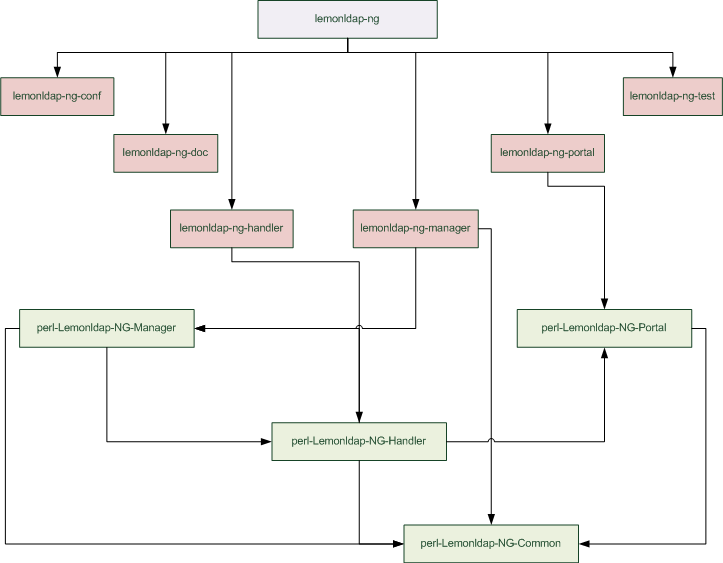
- lemonldap-ng: meta-package, contains no file but dependencies on other packages
- lemonldap-ng-doc: contains HTML documentation and project docs (README, etc.)
- lemonldap-ng-conf: contains default configuration (DNS domain: example.com)
- lemonldap-ng-test: contains sample CGI test page
- lemonldap-ng-handler: contains Apache Handler implementation (agent)
- lemonldap-ng-manager: contains administration interface and session explorer
- lemonldap-ng-portal: contains authentication portal and menu
- perl-Lemonldap-NG-Common: CPAN - Shared modules
- perl-Lemonldap-NG-Handler: CPAN - Handler modules
- perl-Lemonldap-NG-Manager: CPAN - Manager modules
- perl-Lemonldap-NG-Portal: CPAN - Portal modules
This schema shows the dependencies between modules:
Get the packages
YUM repository
You can add this YUM repository to get recent packages:
vi /etc/yum.repos.d/lemonldap-ng.repo
[lemonldap-ng]
name=LemonLDAP::NG packages
baseurl=http://lemonldap-ng.org/rpm/
enabled=1
gpgcheck=1
gpgkey=file:///etc/pki/rpm-gpg/RPM-GPG-KEY-OW2
baseurl=http://lemonldap-ng.org/rpm6/
Change the base URL for EL7 packages:
baseurl=http://lemonldap-ng.org/rpm7/
Run this to update packages cache:
yum update
Manual download
RPMs are available on the Download page.
Package GPG signature
The GPG key can be downloaded here: rpm-gpg-key-ow2
Install it to trust RPMs:
rpm --import rpm-gpg-key-ow2
Install packages
With YUM
If the packages are stored in a yum repository:
yum install lemonldap-ng
Transaction Summary
===================================================
Install      82 Package(s)
Upgrade       0 Package(s)

Total download size: 18 M
Is this ok [y/N]: y
You can also use yum on local RPMs file:
yum localinstall lemonldap-ng-* perl-Lemonldap-NG-*
With RPM
Before installing the packages, install all dependencies.
You have then to install all the downloaded packages:
rpm -Uvh lemonldap-ng-* perl-Lemonldap-NG-*
lemonldap-ng-portal, lemonldap-ng-handler or lemonldap-ng-manager.
Install the package lemonldap-ng-conf on all server which contains one of those packages.
ln -s /usr/lib/perl5/vendor_perl/5.8.8/Lemonldap /usr/lib64/perl5/
ln -s /usr/lib/perl5/vendor_perl/5.8.8/auto/Lemonldap /usr/lib64/perl5/auto/
First configuration steps
Change default DNS domain
By default, DNS domain is example.com. You can change it quick with a sed command. For example, we change it to ow2.org:
sed -i 's/example\.com/ow2.org/g' /etc/lemonldap-ng/* /var/lib/lemonldap-ng/conf/lmConf-1 /var/lib/lemonldap-ng/test/index.pl
Apache virtual host
If LL::NG is the only software installed in Apache, the virtual host feature may not have already been activated.
To do it, uncomment the NameVirtualHost line in /etc/httpd/conf.d/z-lemonldap-ng-handler.conf:
NameVirtualHost *:80
Check Apache configuration and restart:
apachectl configtest
apachectl restart
Default virtual host
Apache on RedHat comes with a default virtual host:
<LocationMatch "^/+$">
Options -Indexes
ErrorDocument 403 /.noindex.html
</LocationMatch>
This conflicts with LemonLDAP::NG ErrorDocument configuration, so you need to comment this part of the vhost. If you have an apache fresh install, it can be a good idea to completely disable the welcome vhost.
Reload virtual host
To allow the manager to reload the configuration, register the reload virtual host name in the hosts of the server:
echo "127.0.0.1 reload.example.com" >> /etc/hosts
Upgrade
If you upgraded LL::NG, check all upgrade notes.
For apache configuration, you may have to remove the old symbolic link, if not done by the RPM:
rm -f /etc/httpd/conf.d/z-lemonldap-ng.conf
Your old Apache configuration should have been saved, you need to port your specificities in new Apache configuration files:
vi /etc/lemonldap-ng/apache2.conf.rpmsave
The upgrade process will also have migrate old configuration files into /etc/lemonldap-ng/lemonldap-ng.ini. This includes the application list which is now set in the applicationList parameter from [portal] section, for example:
[portal]
applicationList={ 'Menu' => { type => 'category', 'Example' => { type => 'category', 'test1' => { type => 'application', options => { name => 'Application Test 1', uri => 'http://test1.example.com/', description => 'A simple application displaying authenticated user', logo => 'wheels.png', display => 'auto',  }, },'test2' => { type => 'application', options => { name => 'Application Test 2', uri => 'http://test2.example.com/', description => 'The same simple application displaying authenticated user', logo => 'wheels.png', display => 'auto',  }, }, },'Administration' => { type => 'category', 'manager' => { type => 'application', options => { name => 'WebSSO Manager', uri => 'http://manager.example.com/', description => 'Configure LemonLDAP::NG WebSSO', logo => 'tools.png', display => 'on',  }, },'sessions' => { type => 'application', options => { name => 'Sessions explorer', uri => 'http://manager.example.com/sessions.pl', description => 'Explore WebSSO sessions', logo => 'tools.png', display => 'on',  }, }, },'Documentation' => { type => 'category', 'localdoc' => { type => 'application', options => { name => 'Local documentation', uri => 'http://manager.example.com/doc/', description => 'Documentation supplied with LemonLDAP::NG', logo => 'docs.png', display => 'on',  }, },'officialwebsite' => { type => 'application', options => { name => 'Offical Website', uri => 'http://wiki.lemonldap.objectweb.org/xwiki/bin/view/NG/Presentation', description => 'Official LemonLDAP::NG Website', logo => 'web.png', display => 'on',  }, }, }, }, }
applicationList parameter from /etc/lemonldap-ng/lemonldap-ng.ini.
DNS
Configure your DNS server to resolve names with your server IP.
example.com, launch the following :
cat /etc/lemonldap-ng/for_etc_hosts >> /etc/hosts
Follow the next steps
File location
- Configuration is in /etc/lemonldap-ng
- LemonLDAP::NG configuration (edited by the Manager) is in /var/lib/lemonldap-ng/conf/
- All Perl modules are in the VENDOR perl directory
- All Perl scripts/pages are in /var/lib/lemonldap-ng/
- All static content (examples, CSS, images, etc.) is in /usr/share/lemonldap-ng/
Build your packages
If you need it, you can rebuild RPMs:
- Install rpm-build package
- Install all build dependencies (see BuildRequires in lemonldap-ng.spec)
- Put LemonLDAP::NG tarball in %_topdir/SOURCES
- Edit ~/.rpmmacros and set your build parameters (example for RHEL5):
%_topdir /home/user/build
%dist .el5
%rhel 5
- Go to %_topdir
- Build:
rpmbuild -ta SOURCES/lemonldap-ng-VERSION.tar.gz
